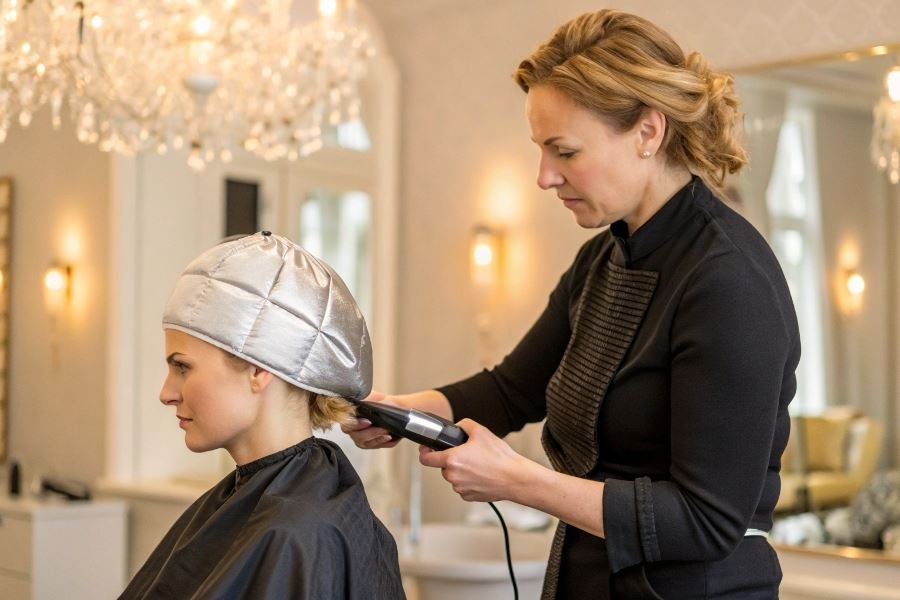
Ever wondered why salon treatments seem to deliver dramatically better results than at-home attempts? The secret might be sitting right on top of your head—a thermal cap. This unassuming hair accessory could be the missing link between mediocre and magnificent results.
A thermal cap is essentially a heat-retaining head covering designed to amplify the effectiveness of hair treatments. Think of it as a mini-sauna for your hair. When placed over treatment-saturated strands, it creates a controlled environment where heat opens the hair cuticle, allowing conditioning ingredients to penetrate deeper than they would at room temperature.
The science is fascinating. When heat is applied to the hair shaft, it causes the cuticle layers to lift slightly. This molecular dance creates pathways for treatment ingredients to reach the cortex—the inner structure of your hair where the magic happens. Studies show that heat can increase product absorption by up to 60% compared to non-heated application methods.
The transformation goes beyond surface-level
Properly using a thermal cap transforms ordinary hair treatments into extraordinary experiences. Deep conditioners work more effectively, protein treatments bond more thoroughly, and color treatments develop more vibrantly. The controlled heat environment ensures:
- Enhanced ingredient penetration for deeper repair
- Accelerated processing time without compromising results
- More uniform treatment distribution from roots to ends
- Extended longevity of treatment benefits
For damaged hair, thermal caps can be particularly revolutionary. The heat helps to temporarily realign protein bonds, creating a smoother, more cohesive structure. This is why many professional keratin treatments incorporate heat as a critical component.
“Heat is to hair treatments what a catalyst is to a chemical reaction—it doesn’t change what happens, but dramatically speeds up and enhances the process.”
When used correctly, this simple tool can elevate your hair care routine from basic maintenance to transformative therapy.
Mastering the Thermal Cap: Your Step-by-Step Guide
Preparation is Everything
Before diving into the world of thermal treatments, proper preparation makes all the difference. Start with freshly washed hair using a clarifying shampoo to remove product buildup. Towel-dry until your hair is damp—not dripping wet or completely dry. This optimal moisture level ensures heat distribution remains even throughout your treatment.
The effectiveness of your thermal cap session depends largely on how you prepare both your hair and the products you’ll use. For deep conditioning treatments, section your hair into 4-6 parts using clips to ensure thorough application. Pre-warm your conditioning product by placing the bottle in warm water for 3-5 minutes—this helps it penetrate the hair shaft more effectively when you properly use a thermal cap for maximum effect during your treatment session.
Pro tip: Keep a spray bottle with water nearby to rewet any sections that dry out during the preparation process. Your hair should maintain consistent dampness for optimal product absorption.
Application Techniques for Different Treatments
Different hair treatments require specific application approaches when using a thermal cap:
- Deep conditioning: Apply product from mid-shaft to ends first, then work toward the roots. Use a wide-tooth comb to distribute evenly.
- Hair masks: Apply generously throughout, focusing on damaged areas. Use fingertips to massage the product in circular motions.
- Hot oil treatments: Warm the oil first, then apply in sections, concentrating on the scalp and ends where dryness is most common.
- Color treatments: Follow product-specific instructions, but generally apply evenly from roots to tips in thin sections.
Remember: The thermal cap amplifies whatever you’re applying, so distribution matters tremendously. Uneven application leads to uneven results.
Temperature and Timing Mastery
The magic of thermal treatments happens at the intersection of perfect timing and temperature:
| Treatment Type | Optimal Temperature | Recommended Time |
|---|---|---|
| Deep Conditioner | 110-120°F (43-49°C) | 20-30 minutes |
| Protein Treatment | 100-110°F (38-43°C) | 15-20 minutes |
| Hot Oil | 105-115°F (40-46°C) | 25-35 minutes |
| Hair Mask | 115-125°F (46-52°C) | 30-45 minutes |
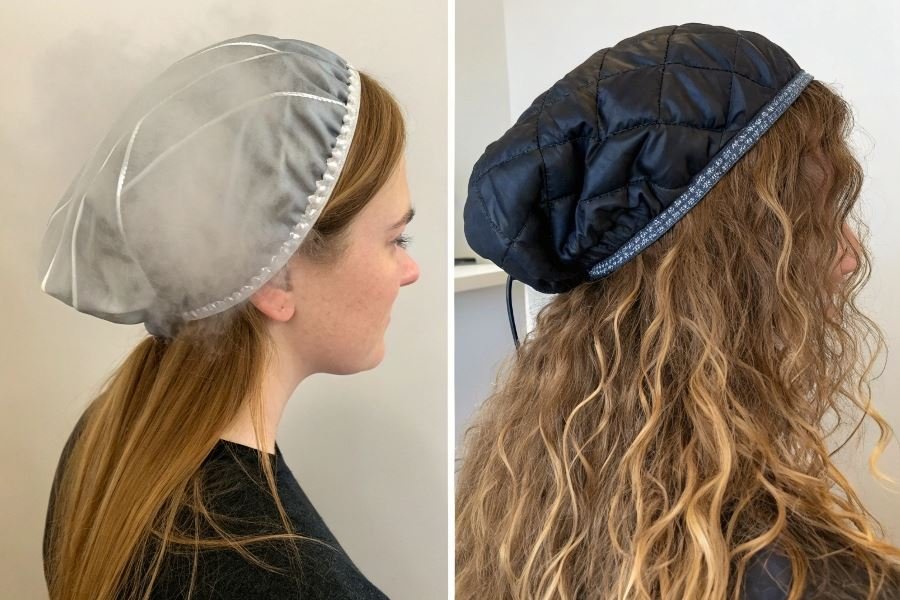
Most electric thermal caps have temperature settings, but for microwavable or cordless options, test the temperature against your wrist before placing it on your head. The cap should feel warm—never hot enough to cause discomfort.
Warning: Exceeding recommended times won’t enhance results and may cause protein overload or moisture fatigue in your hair strands.
Post-Treatment Protocol
The moments after removing your thermal cap are crucial for locking in benefits:
- Remove the cap gently without tugging on treated hair
- Allow your hair to cool for 3-5 minutes before rinsing
- Rinse with cool water to seal the cuticle (warm water for protein treatments)
- Apply a leave-in conditioner to maintain moisture balance
- Air-dry whenever possible to avoid heat damage
For maximum cumulative benefits, maintain a consistent schedule—weekly treatments for damaged hair, bi-weekly for maintenance. Document your results with photos to track improvements over time.
The post-treatment window is when your hair is most receptive to styling products, so this is the perfect time to apply any leave-in treatments you regularly use.
By following these precise steps, your thermal cap becomes not just an accessory but a transformative tool in your hair care arsenal.
Maximizing Your Thermal Cap Results: The Ultimate Guide
Thermal caps have revolutionized home hair treatments, but are you getting the absolute most from yours? Let’s dive into the strategies that separate casual users from those achieving salon-quality results at home.
Selecting power-packed products
The magic of thermal caps lies in their ability to amplify product penetration. Choosing the right formulations makes all the difference:
Deep conditioning masks with molecular weights designed for heat activation deliver dramatically better results than standard conditioners. Look for products containing hydrolyzed proteins, ceramides, and panthenol, which respond exceptionally well to controlled heat.
Pro tip: Apply products to slightly damp rather than soaking wet hair to prevent dilution and maximize absorption.
For those battling specific hair concerns, consider these specialized options:
| Hair Concern | Recommended Ingredient | Expected Result |
|---|---|---|
| Dryness | Argan oil, shea butter | Restored moisture barrier |
| Damage | Keratin, bond builders | Strengthened hair structure |
| Color-treated | UV protectants, acidic formulas | Extended color vibrancy |
When using Olaplex or similar bond-building treatments, thermal caps can reduce necessary processing time by up to 40% while improving penetration to the cortex layer.
Maintaining your thermal investment
Your thermal cap’s effectiveness directly correlates with its maintenance routine. Many users experience diminishing results without realizing their maintenance habits are the culprit.
Cleaning schedule: After every 3-4 uses, wipe the interior with a microfiber cloth dampened with diluted alcohol solution (70% isopropyl alcohol). This prevents product buildup that can inhibit heat distribution.
Storage matters: Fold rather than crumple your cap when storing. This preserves the heating elements and extends operational lifespan by preventing stress on connection points.
The most common mistake? Exposing the electrical components to excessive moisture during cleaning.
For caps with removable liners, machine wash the liner on gentle cycle every 2-3 weeks using fragrance-free detergent. Always air dry completely before reassembling.
Thermal caps with properly maintained heating elements typically maintain optimal temperature regulation for 2-3 years of regular use.
Creating your treatment calendar
Consistency trumps intensity when it comes to thermal treatments. The cumulative effect of regular sessions delivers transformative results that sporadic treatments simply cannot match.
Frequency framework:
- Normal hair: 20-minute sessions once weekly
- Damaged hair: 15-minute sessions twice weekly
- Extremely processed hair: 10-minute sessions three times weekly
Track your results with photos taken in identical lighting conditions every 30 days. This visual documentation reveals subtle improvements that might otherwise go unnoticed.
Seasonal adjustments should be part of your strategy. During winter months when indoor heating systems deplete moisture, increase frequency by one additional session weekly. During humid summer months, focus treatments on smoothing and anti-frizz formulations.
Measurement matters: Use a digital kitchen timer rather than estimating treatment duration. Even 5 minutes of additional heat can make the difference between adequate and exceptional results.
By implementing these three enhancement strategies—optimized product selection, diligent maintenance, and consistent scheduling—your thermal cap will deliver the transformative results it was designed to achieve.
Discover the secrets to maximizing hair treatment absorption with proper thermal cap techniques. Learn optimal timing, temperature settings, and product pairings for deeper conditioning, faster results, and healthier, more vibrant hair.
Discover the secrets to maximizing hair treatment absorption with proper thermal cap techniques. Learn optimal timing, temperature settings, and product pairings for deeper conditioning, faster results, and healthier, more vibrant hair.