Ever watched a master tailor at work? There’s a rhythm—a dance between creator and tools—that transforms fabric into art. This magic doesn’t happen by accident. Behind every perfectly executed stitch lies something surprisingly mundane yet critically important: thoughtful workspace organization.
The difference between a struggling sewing operation and a thriving one often comes down to how intelligently the physical space is arranged. Professional sewists know that organizing a workspace in a sewing shop—particularly selecting optimal tables—isn’t just about aesthetics; it’s about creating a foundation for productivity that pays dividends with every project.
The efficiency equation is simple: When tools are within reach and materials flow logically from cutting to assembly to finishing, production time decreases while quality increases. Studies show that optimized sewing workspaces can improve output by up to 30% without sacrificing craftsmanship.
The ergonomic advantage
Your body is your primary tool. Tables at improper heights force hunching, causing fatigue and potential long-term injury. The ideal sewing table positions your work at elbow height when seated, allowing your shoulders to remain relaxed while you focus on precision rather than discomfort.
Space assessment: The critical first step
Before purchasing a single table, map your workflow. Where does fabric enter? How does it transform through each stage? What are your movement patterns? The answers reveal your spatial needs:
- Cutting requires expansive, stable surfaces
- Machine sewing demands sturdy, vibration-resistant tables
- Hand-finishing benefits from adjustable-height options
Remember: your workspace isn’t just where you sew—it’s how you sew. Design it intentionally, and watch your productivity soar.
Function-Driven Table Selection for Your Sewing Workshop
The heart of any productive sewing operation lies in its workstations. When professional sewists talk about their workspace, they’re not just discussing furniture—they’re describing the foundation of their craft and business efficiency. How to organize a workspace in a sewing shop: choosing optimal tables requires understanding that different sewing processes demand specialized surfaces designed for specific functions. Let’s dive into the critical workstations that form the backbone of a well-designed sewing workshop.
Cutting Tables: The Foundation of Precision
Cutting tables represent your first interaction with fabric and pattern—where precision begins. The ideal cutting table stands between 36-38 inches high, significantly taller than standard tables to prevent back strain during extended cutting sessions.
Surface area matters tremendously. Professional cutting tables should provide at least 36 x 60 inches of workspace, though commercial operations often benefit from tables measuring 4 x 8 feet or larger. This generous space allows for full pattern layouts even with larger garments or home décor projects.
Material selection for cutting surfaces isn’t arbitrary—it’s strategic:
| Surface Material | Advantages | Best For |
|---|---|---|
| Self-healing mats | Protects blades, provides grid lines | Rotary cutting, detailed work |
| Laminate | Smooth, durable, easy to clean | All-purpose cutting, heavy use |
| Wood | Sturdy, traditional feel | Pattern weights, pins if covered |
Look for tables with built-in storage underneath for patterns and tools, and consider models with adjustable height mechanisms if multiple people share the workspace.
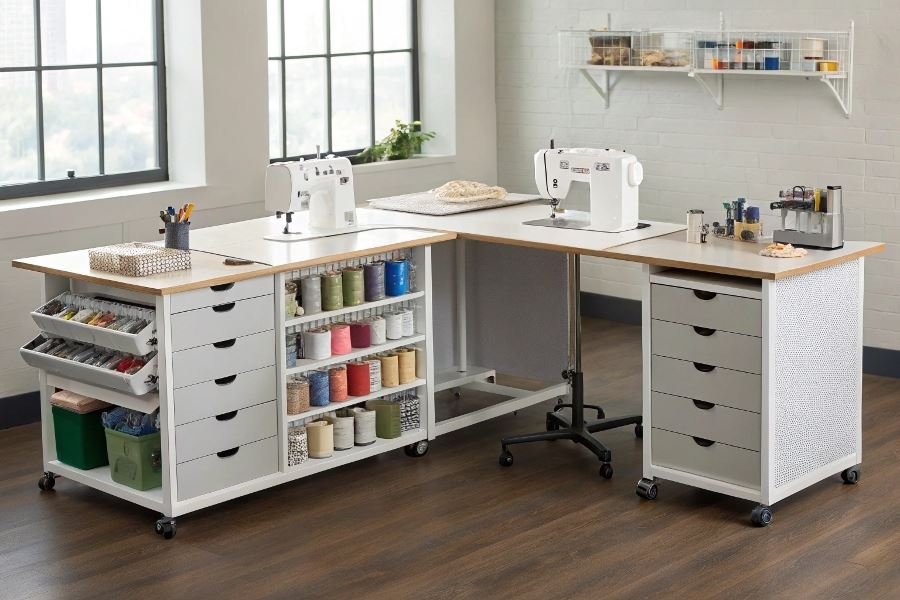
Sewing Machine Tables: Stability Is Non-Negotiable
Your sewing machine table serves as command central—where ideas transform into reality. The primary consideration here is unwavering stability. Even minor vibrations can affect stitch quality and precision, particularly at higher speeds.
The ideal sewing table features:
- Adjustable height (between 28-30 inches typically works best)
- Recessed platform allowing the machine to sit flush with the table surface
- Heavy construction that minimizes vibration during operation
- Ample clearance on all sides (minimum 24 inches depth, 40+ inches width)
Storage integration transforms good sewing tables into great ones. Look for models from Horn of America or Koala Studios that incorporate thread drawers, notion storage, and dedicated spaces for frequently used tools within arm’s reach.
Pressing and Finishing Stations: Heat-Resistant Workhorses
The pressing station often receives less attention than it deserves, yet proper pressing fundamentally affects your final product quality. These workstations require specialized considerations:
- Heat resistance is paramount—melamine, metal-topped, or specially treated surfaces prevent scorching
- Nearby electrical outlets for irons, steamers, and pressing equipment
- Adjustable height (38-40 inches typically provides optimal leverage for pressing)
- Accessible water source for steam irons or separate steaming systems
The most efficient pressing stations include a standard ironing board, a sleeve board, a pressing ham, and a flat pressing surface—all within a compact footprint. Consider Reliable Corporation professional pressing equipment for commercial-grade durability.
By thoughtfully configuring these three distinct workstation types, you’ll create a workflow that minimizes unnecessary movement, reduces fatigue, and maximizes productivity. Remember that the investment in quality tables pays dividends in comfort, efficiency, and ultimately, the quality of your finished products.
From Plan to Reality: Implementing Your Sewing Workspace Vision
Creating a phased implementation plan
Transforming your sewing shop workspace doesn’t happen overnight. The most successful reorganizations follow a methodical, phased approach that minimizes disruption while maximizing results. Start by categorizing your implementation into three distinct phases:
Phase 1: Foundation work – Begin with the essential infrastructure changes like electrical updates, lighting improvements, and any necessary construction. This phase typically requires 2-3 weeks depending on the scope.
Phase 2: Table installation and primary equipment – Once your foundation is solid, bring in your carefully selected sewing tables and position your primary equipment. Allow 1-2 weeks for this phase, including proper ergonomic adjustments.
Phase 3: Organization systems and workflow refinement – Finally, implement your storage solutions, thread organization systems, and workflow pathways. This phase often takes 1-2 weeks but pays enormous dividends in efficiency.
The most common implementation mistake isn’t poor planning—it’s trying to do everything at once. A phased approach keeps your business operational while improvements happen systematically.
Document each phase with before-and-after photos. This visual record not only provides satisfaction but serves as valuable reference material for future adjustments.
Evaluating and adjusting your workspace
Once implemented, your workspace isn’t set in stone—it’s a living system that requires evaluation and fine-tuning. Establish clear metrics to gauge effectiveness:
- Production completion times
- Error/rework rates
- Staff comfort levels (via structured feedback)
- Material waste percentages
- Energy levels at day’s end
Create a simple evaluation schedule: daily quick-checks, weekly mini-reviews, and monthly comprehensive assessments. Use a digital tracking tool like Trello or Asana to maintain consistency.
When adjustments become necessary, make them incrementally. Moving a cutting table six inches can dramatically improve workflow without requiring a complete reorganization. Remember that small tweaks often yield outsized results.
Maintaining organization for long-term efficiency
The true test of any workspace design isn’t the first week—it’s the first year. Maintaining your optimized setup requires both systems and discipline:
Daily maintenance routines – Implement a 15-minute end-of-day reset protocol where everything returns to its designated position. This simple habit prevents the gradual chaos that undermines even the best workspace designs.
Monthly deep organization – Schedule a monthly 2-hour session to address areas that have begun to drift from your original vision. This might include thread reorganization, notion inventory, or tool maintenance.
Quarterly workflow audits – Every three months, step back and observe your entire operation with fresh eyes. Watch for bottlenecks, unnecessary movements, or areas where staff naturally create workarounds.
Annual comprehensive review – Set aside time annually to thoroughly evaluate your workspace against current needs. Businesses evolve, and your workspace should adapt accordingly.
Consider implementing a tool tracking system using simple color-coding or a check-out board. The Horn of America sewing furniture line offers integrated tool organization systems that maintain order without adding complexity.
Remember that the most efficient sewing workspaces aren’t necessarily the most expensive—they’re the most thoughtfully maintained. With proper implementation, regular evaluation, and consistent maintenance, your optimized sewing workspace will continue delivering productivity benefits for years to come.
Discover how to create an efficient sewing shop with ergonomic workspace organization. Learn to select optimal cutting, sewing, and pressing tables that enhance productivity, reduce fatigue, and improve workflow in your professional sewing environment.
Discover how to create an efficient sewing shop with ergonomic workspace organization. Learn to select optimal cutting, sewing, and pressing tables that enhance productivity, reduce fatigue, and improve workflow in your professional sewing environment.